


//// Gravity Forms \\\\
Biggest era of WordPress Form Solutions
(Create Any Custom Form That You Can Visualize)
====/////====/////====/////====/////====
/////G\\\\ Gravity Form all video playlist: https://www.youtube.com/watch?v=z3IpDwhU458&list=PLvfhcWty9XnDOPf9Wj3hTlyPHVFMm4olA
/////G\\\\ Single Topic Wise Video :
Gravity Form intro https://www.youtube.com/z3IpDwhU458
Gravity Form SIMPLE SIGNUP https://youtu.be/wxxvk-BJGT8
Gravity Form multistep https://www.youtube.com/0XQ0uOhyULA
confirmation & admin Notify https://www.youtube.com/CrR4CJApAEo
Gravity Form PoP Up https://www.youtube.com/2aKfO5CdJvE
Gravity Form mailchimp https://www.youtube.com/773T6Pnar20
Gravity Form Style Pro https://www.youtube.com/IvslCsal00k
Gravity form style – by essential addons: https://youtu.be/R6HWqR3oI7c
Gravity Form product payment calculation(paypal) https://www.youtube.com/01keQxT3zq8
Advanced Paypal & Stripe Payment Gravity Form : https://youtu.be/gyMXMssRb8k
Gravity Form Quiz https://www.youtube.com/ibFYBruCu1o
Gravity PDF & Conditional Logic: https://youtu.be/80AWdksBieA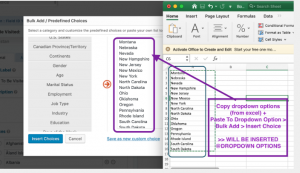
Gravity Form Preview Submission https://www.youtube.com/r6CNFsjm978
Advanced For Gravity Live Population Form: https://youtu.be/Yyiaj2-1Sx0
/////G\\\\ Get All 80+ Gravity Plugins & Addons : https://bit.ly/cmbdgravity
/////G\\\\ Get Essential Addons Elementor :
https://mega.nz/#!DTp1HS5K!w2-UFnwfpjF-m9g6jdz-S6hA0HQfthGVCnAehmNaSW4
/////G\\\\ Gravity Form License Activate :
- After form plugin install & activate > click “Form” > all form >
- Keep license field “Blank” > next
- You will see license is enabled
- Next > next > create a form
/////G\\\\ Gravity Form Insert at web page :
Form insert option-01 (by shortcode & form id) :
[gravityform id=”1″ title=”true” description=”true” ajax=”true”]
Form insert option-02 (by Essential Addons Elementor & Insert & Customize form) :
/////G\\\\ Get Essential Addons Elementor : https://mega.nz/#!CXYVgYSC!w2-UFnwfpjF-m9g6jdz-S6hA0HQfthGVCnAehmNaSW4
*** This is 3rd party addons of elememtor : https://essential-addons.com/elementor/
*** By this you can customize any wp form by elementor
*** must need essential addons premium version + elementor + elementor pro
/////G\\\\ How insert & customize by elementor & essential addons :
– এলিমেন্টর & এলিমেন্টর প্রো & এসেনটিয়াল অ্যাড-অন্স প্রিমিয়াম প্লাগিন লাগবে – এলিমেন্টর & এলিমেন্টর প্রো & এসেনটিয়াল অ্যাড-অন্স প্রিমিয়াম প্লাগিন লাগবে
– ফর্ম বিল্ডার দিয়ে ফর্ম বানানো (যেমন প্লাগিন দিয়ে ফর্ম বানাবো )
– পেজ ডিসাইন এর সময় এলিমেন্টর দিয়ে – “গ্রাভিটি ফর্ম ” widget দিয়ে বানানো ফর্ম পেজ এ ইন্সার্ট করবো (এটা এসেনটিয়াল অ্যাড-অন্স এর widget )
– এবার এলিমেন্টর দিয়ে মন মতো ফর্ম এর সব ফিল্ড ডিসাইন করবো
*** গ্রাভিটি Formv এর নিজের ও এমন কাস্টোম কোনো প্লাগিন নাই ডিসাইন এর জন্য
*** কন্ট্যাক্ট ফর্ম ৭, WP -FORM, ninja form, মাইলচিম্প ফর্ম এর জন্য – একই ভাবে এসেনটিয়াল অ্যাড-অন কাজ করে ।
– এলিমেন্টর & এলিমেন্টর প্রো & এসেনটিয়াল অ্যাড-অন্স প্রিমিয়াম প্লাগিন লাগবে
– ফর্ম বিল্ডার দিয়ে ফর্ম বানানো (যেমন প্লাগিন দিয়ে ফর্ম বানাবো )
– পেজ ডিসাইন এর সময় এলিমেন্টর দিয়ে – “গ্রাভিটি ফর্ম ” widget দিয়ে বানানো ফর্ম পেজ এ ইন্সার্ট করবো (এটা এসেনটিয়াল অ্যাড-অন্স এর widget )
– এবার এলিমেন্টর দিয়ে মন মতো ফর্ম এর সব ফিল্ড ডিসাইন করবো
*** গ্রাভিটি ওরম এর নিজের ও এমন কাস্টোম কোনো প্লাগিন নাই ডিসাইন এর জন্য
*** কন্ট্যাক্ট ফর্ম ৭, WP -FORM, ninja form, মাইলচিম্প ফর্ম এর জন্য – একই ভাবে এসেনটিয়াল অ্যাড-অন কাজ করে ।
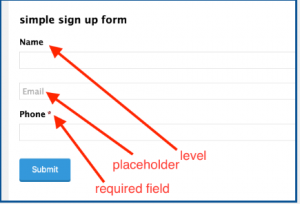
/////G\\\\Form Level & Placeholder :
////G\\\\ Phone Formatting :
==============
USA : (###)###-####: (144)347-8879
**** International: any phone number (Use this one always for phone)
Form Description:
write any coution message – what you want to show during form filled up 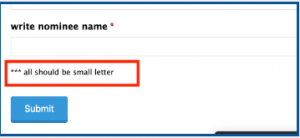
Error Message Configure
Edit form field > appearance > Custom Validation Message: “write the error messages”
>>> Given Dropdown Field & Bulk Import for choice:
> add dropdown > choose Bulk >
> get all countries
> all US states
> all gender choice
all cities
> all age group
>>> Bulk Upload – Dropdown/ Radio/ Multi Select
- Take a dropdown/radio/multi select field
- At choice option there are “BULK ADD”
- Now at right there are : BLANK FILED
- Option-01: Copy Paste – 1000 Choice from excel
- Option-02: At left pre defined bulk options (like all countries / all zip US)
YOU CAN USE ANY ONE FOR BULK CHOICE OPTION INSERTING
>>> Input Musk
- If email field chose : it will required : @ .com
- Only numbers (max 5 characters) like this
>>> Configure Input Musk
- Add a “single line text”
- Tick -> input musk
- Custom musk ->
>>> Custom Input Musks
- If alphabet(Upper/Lowercase) both -> write *
(ex: Minhaz ASIF)
- If alphabet(Lowercase) both -> write a
(ex: minhazul asif)
- If numeric -> write 9
(ex: 01871993300)
- If date format -> write 9
(ex: format will be : dd/mm/yyyy: input musk: 99/99/9999)
(ex: format will be : dd/jan/yyyy: input musk: 99/aaa/9999)
- If limit character(max character fix) -> aaaa or **** or 9999
(ex: 4 letter : asif)
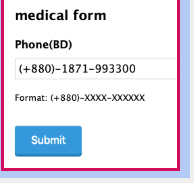
Phone:
@description: Format: (+880)-XXXX-XXXXXX
Input musk : custom: (+999)-9999-999999
/////G\\\\Form Design : 01 :
- Simple Signup/ contact Form
====/////====/////====/////====
Process
=========
- Name
- Phone
- Message
- Gender : radio – Mail/ Female / 3rd Gender
- Course: Dropdown – wp/ web / lead
- Checkbox, I agree
How to add and design a gravity form at a page
=========================================
-
- Install & activate essential elementor addons
- From wp dashboard > click essential addons
- Click: elements > ENABLE ALL > Save Changes
- Create a page edit with elementor > add “EA GRAVITY FORM”
- Now choose – the gravity form – that you created
- ENABLE : Custom Title & Description : write “preferred title”
- DISABLE: Title
- Settings > page layout : elementor full width
- Edit EA Gravity Forms > Style
- ENJOY UNLIMITED CUSTOMIZATION
- Form container : background color: + add padding + form width
- Input & Textarea: input box background color + text color + input width + SPACING
- SUBMIT BUTTON: fill width + background color + text color
- Error message : text color : RED
- Radio & Checkbox: Custom Style > increase size + color & checked color
- Thanks you message – color + font + color
Lecture -02
================
/////G\\\\Form Design : 02 :
- Multi Section Form
====/////====/////====/////====
Process
==========
> add section: personal info
—————————————
– name
> add
section: company info
—————————————
– company name
– job title
> add section: education info
—————————————
– university name
– subject
/////G\\\\Form Design : 03 :
- Multi Step Form
====/////====/////====/////====
Process
=========
> Add some page break
> add page break: personal info
—————————————
– name
> add page break: company info
—————————————
– company name
– job title
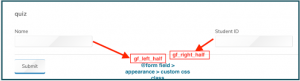
Custom Css Class
Process
===============
- Add 2 form fields : “NAME” & “EMAIL”
- As general – both will show one after another
- Edit each field > Go Appearance > Custom Css Class:
- @Name, write: gf_left_half
- @Email, write: gf_right_half
- Now you will see : both filed : at a single row/ line
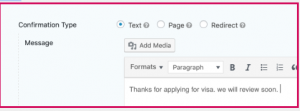
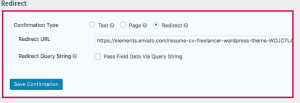
Confirmation message
==============
- Go to form > edit >
- Settings > confirmation > default confirmation edit >
- Paste msg that client give you
Process
===============
- Add 2 form fields : “NAME” & “EMAIL”
- As general – both will show one after another
- Edit each field > Go Appearance > Custom Css Class:
- @Name, write: gf_left_half
- @Email, write: gf_right_half
- Now you will see : both filed : at a single row/ line
Confirmation message
==============
- Go to form > edit >
- Settings > confirmation > default confirmation edit >
- Paste msg that client give you
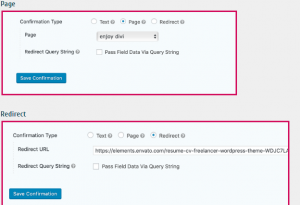
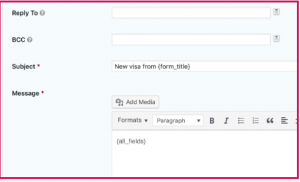
Admin Notification
===================
- this is the admin email that website owner will get
- default wordpress dashboard admin email treated as admin email
- you can change “ from email”
- change subject
- change personal admin email body
- by default viewer data that is filledup by viewer go to admin email
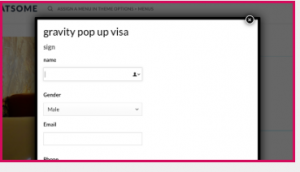
/////G\\\\Form Design : 04 :
- Gravity PopUp Maker
====/////====/////====/////====
- Get this free: https://wordpress.org/plugins/popup-maker/
Process
========================
- Create a General form which we want to to show at on click popup
- install popup maker plugin
- from dashboard click popup maker add > new popup
- give a title “fform pop up”
- ADD A GRAVITY FORM to the pop up content
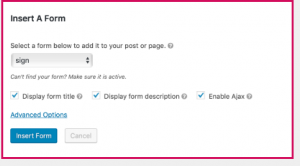
- TRIGGER > ADD new trigger > auto open
- Targeting: choose page/ pages where you want to show the popup
- Display > pop up THEME: LIGHT BOX
- Create a page/ put the shortcode from pop up maker
- When you click on the button the gravity form will be popupe.